Guess what!
Our 10 year wedding anniversary is this weekend and we're the "I can't wait to give this to you!" type when it comes to presents so we exchanged a couple days ago. Mr. S got me a sewing machine!
One of my goals for the year is to a.) learn to sew and b.) sew E's receiving blankets into a quilt for his big boy bed (when the time comes... oh, I'm tearing up just thinking about him in a big boy bed.) That might be ambitious to accomplish in 10 months. I don't know. I've sewn before, but it's been a really long time and I never really did it enough to get good at it. It'll be an adventure, that's for sure.
The sewing machine is super fancy and I'm not familiar enough to even thread it so it's sitting in the box until I can redeem my free lessons/tutorial/orientation/whatever... which isn't until the 16th. Eek! I'm so excited to get started. I don't know how I'm going to last until the 16th.
So now, I have a new addiction-- pinning quilts on Pinterest. Wanna follow? Here's my quilt board.
In the meantime, maybe I should make it my goal to finish a scrapbook. For example, E's first year... which is 7 months past due. I don't know though... finishing one project before starting another? That just sounds like crazy talk!
What projects do you have waiting to get started? What long term projects are still waiting to be finished?
Is the sewing machine the traditional 10 year anniversary gift? Maybe the modern version? Haha... yeah, I doubt it.
Thursday, February 28, 2013

Tuesday, February 26, 2013
TP Roll Art
You know you've hit a crafting rock bottom when you start doing toilet paper crafts. Don't get me wrong, some of the TP stuff on Pinterest is really cool. Regardless of their cool factor, there will always be a certain ick factor about toilet paper roll crafts... to me, at least.
I've been struggling with what to put on my living room walls for... years? I had lots of things up, then we repainted and nothing went back on the walls. I keep thinking I want to make something, but can't decide what. I'm seriously in decision paralysis... for years!
When I saw these adorable picture frames by Creative Carmella on Pinterest, I got inspired. I don't want the picture aspect of it, but I love the funky circles. So, I ran with them and added a little ombre. It's the new hotness. Everyone loves ombre, right? Ombre and chevrons-- they're the king and queen of crafts right now.
Anyway, still pretty unsure how this would all turn out, I didn't want to spend much. I got a 16"x20" canvas for less than $4 at Hobby Lobby and used some acrylic paints that I already had around. I painted the canvas white. (It was already white, but I wanted to make sure it was as white as it could be.) Then I started with my circles.
After some TP roll diameter measuring (1.75", fyi) and some math, I decided to use three colors. I made three rows of just blue paint (I'm pretty sure the color was True Blue). Then, I added some white paint until I got a medium blue and made three rows of that. Then I added even more white paint to get a light blue and finished with three more rows.
Close up, I think it's cool. The ombre effect is very subtle, which was not what I was going for but it takes a heck of a lot of white paint to lighten that blue at all! And, of course, I didn't realize that until it was way too late.
I put it in the coveted between-the-front-door-and-picture-window position. I don't love it. It's not interesting enough from a distance. I love, love, love bright white on my dark gray walls but the white of the door and the super bright white of the window is just too much on either side of it.
Maybe I'll downgrade it to the hallway-between-the-bathroom-and-master-bedroom position. Or maybe I'll trash it because it cost less than $5 total. Maybe I'll donate it to Goodwill and someone will think they're getting a masterpiece...and they won't know it was painted with toilet paper rolls! Yep, you know it! Someone will be in there thrift shoppin' and they'll say "This is f'n awesome!"
Check out more Pinterest Challenge projects!
I've been struggling with what to put on my living room walls for... years? I had lots of things up, then we repainted and nothing went back on the walls. I keep thinking I want to make something, but can't decide what. I'm seriously in decision paralysis... for years!
When I saw these adorable picture frames by Creative Carmella on Pinterest, I got inspired. I don't want the picture aspect of it, but I love the funky circles. So, I ran with them and added a little ombre. It's the new hotness. Everyone loves ombre, right? Ombre and chevrons-- they're the king and queen of crafts right now.
Anyway, still pretty unsure how this would all turn out, I didn't want to spend much. I got a 16"x20" canvas for less than $4 at Hobby Lobby and used some acrylic paints that I already had around. I painted the canvas white. (It was already white, but I wanted to make sure it was as white as it could be.) Then I started with my circles.
 |
| My Tools (ew) |
Close up, I think it's cool. The ombre effect is very subtle, which was not what I was going for but it takes a heck of a lot of white paint to lighten that blue at all! And, of course, I didn't realize that until it was way too late.
 |
| Do you see the ombre? Sad, sad ombre. |
 |
| Kinda hypnotizing, yes? (Ignore the Command hook peeping out the top-- my temporary hanging solution until I make up my mind.) |
Maybe I'll downgrade it to the hallway-between-the-bathroom-and-master-bedroom position. Or maybe I'll trash it because it cost less than $5 total. Maybe I'll donate it to Goodwill and someone will think they're getting a masterpiece...and they won't know it was painted with toilet paper rolls! Yep, you know it! Someone will be in there thrift shoppin' and they'll say "This is f'n awesome!"
Check out more Pinterest Challenge projects!
Monday, February 25, 2013
Felt Board
I've been working on a project. A very much ongoing project that may just go on forever. I made E a felt board. I bought the biggest (cheap) canvas I could fine at Hobby Lobby, which happened to be 30"x40" and was $16 after my 40% coupon. I cut and hand sewed a grassy hill (green felt) onto a blue sky (blue felt) and then stretched and stapled the whole thing to the canvas. Tada! Felt board. That part was easy, albeit a bit time consuming. That part is also done.
It's all the "game pieces", if you will, that might keep me cutting and sewing felt for the rest of my days. I've been finding inspiration everywhere to make little scenes for E to play with. As soon as I made the first couple pieces, I let him have access to the board. I admit, I typically wait until I'm completely finished with a project before letting destroy...er... play with it. So, it was hard to hand over.
For the past couple weeks, he'd wake up in the morning or from a nap and discover what new pieces are on the board. I'm sure I'll revisit this post many times, but here's what I have so far.
The full scene (minus the third piece of road, which has already disappeared):


Dinosaurs strolling down the road. Makes perfect sense, right? Houses, airplanes, dinosaurs. It happened.


And here's a close-up of that pond. It's really my favorite part. Well, it might be a tie between the pond and the rain cloud.

On my near future to-do list:
It's all the "game pieces", if you will, that might keep me cutting and sewing felt for the rest of my days. I've been finding inspiration everywhere to make little scenes for E to play with. As soon as I made the first couple pieces, I let him have access to the board. I admit, I typically wait until I'm completely finished with a project before letting destroy...er... play with it. So, it was hard to hand over.
For the past couple weeks, he'd wake up in the morning or from a nap and discover what new pieces are on the board. I'm sure I'll revisit this post many times, but here's what I have so far.
The full scene (minus the third piece of road, which has already disappeared):

The slightly flower-ish looking sun. But you know it's a sun because it's wearing sunglasses. right?

The peacefully weepy cloud and the airplane.

Dinosaurs strolling down the road. Makes perfect sense, right? Houses, airplanes, dinosaurs. It happened.

The house (I need to make at least one more), with an apple and lemon tree, and a pond with ducks and a frog next to a coniferous forest of three.


If you've never experienced one of these boards, it all works by friction. Nothing is stuck all that well but it stays in place well enough for imagination time. In fact, because nothing sticks that well, a good slap to the canvas knocks most of it off. I decided it would be HI-larious to bang on the canvas and yell "EARTHQUAKE!" after E had set everything up. He did not think it was funny. In fact, he cried. Maybe he's not the little destroyer I think he is.
On my near future to-do list:
- One more house
- More animals/dinos
- People
- A rocketship
- A bus
- Couple cars/trucks
- Another piece of road
- A rainbow
- Lightning?
- More clouds
Thursday, February 21, 2013
Cold Night, Hot Chocolate
We're expecting ice tonight. The frigid temps have me wanting some yummy hot chocolate.
Oh, who am I kidding? Breathing makes me want some yummy hot chocolate.
I could make this Polar Express Hot Chocolate but I'm missing about half of the ingredients. And, there's no way I'm going out in the cold to get them. And, it's probably not advisable (diet-wise, at least) to be drinking sweetened condensed milk on a Thursday night. And, this recipe makes 10+cups and I don't feel like doing the math to shrink it... and I definitely don't need to be drinking 10 cups of hot chocolate tonight.
So, here it is... some Swiss Miss and marshmallows from a bag. It's not glamorous, but it'll do the trick. And maybe one day, I'll have a reason to make 10 cups of hot chocolate.

Oh, who am I kidding? Breathing makes me want some yummy hot chocolate.
I could make this Polar Express Hot Chocolate but I'm missing about half of the ingredients. And, there's no way I'm going out in the cold to get them. And, it's probably not advisable (diet-wise, at least) to be drinking sweetened condensed milk on a Thursday night. And, this recipe makes 10+cups and I don't feel like doing the math to shrink it... and I definitely don't need to be drinking 10 cups of hot chocolate tonight.
So, here it is... some Swiss Miss and marshmallows from a bag. It's not glamorous, but it'll do the trick. And maybe one day, I'll have a reason to make 10 cups of hot chocolate.

Wednesday, February 20, 2013
Rain Stick
Our office is moving to a different building in the next couple months. Last Friday was slow so I was doing a little tidying up to get ready for the move. Stashed way under my desk, I found a long mailing tube that someone had sent to me.



I immediately flashed back to this list of the 5 Best Toys of All Time. Could it be true? Did I just find the #4 best toy of all time under my desk? I mean, E has played with toilet paper tubes, paper towel tubes and even a wrapping paper tube, but this was taking it to a whole new level. How lucky is E?!
But then, I started thinking even more creatively. What about a rain stick? Surprisingly, it wasn't something I had pinned on Pinterest. It was something I had just seen in passing while surfing the interwebs. I actually had to re-search for it and find a site with a good how-to. This one from Mama Scout seemed the most like what I was looking for.
Here's how mine went...
My supplies included the coveted mailing tube, a crap ton of nails (I think I used a total of 80), something to make the noise-- I used beans and also (not pictured) rice, something to pretty it up (mine is fabric wrapped).

First, I hammered. And hammered and hammered. The cardboard mailing tube is perfect for the nail approach (verses some of the other approaches I've seen using tooth picks or skewers) because it's easy to hammer into, but quite sturdy. I made circles around the tube with nails, trying to stagger them as much as possible. I think I used 80 nails, and I could've used another box if I had it.


This certainly does not look like a toddler toy, right? No worries, I took some safety precautions. I wrapped the whole tube in packing tape to keep the nails in place-- and add an extra layer of protection between the nails and E's curious fingers.

Next came the filler. I started with just beans but I needed a softer sound so I added some rice. It's really a trial and error kind of thing. You just need to test it out until you find the sound you like. I admit, I wish I had used more nails because I feel like my fillings fall a little too fast. I was just too dang excited to complete it to run out for another box of nails. It's sort of rain stick-y but it's really more like an oddly shaped maraca. Whatever. It makes noise and that's the #1 feature to an 18 month old.
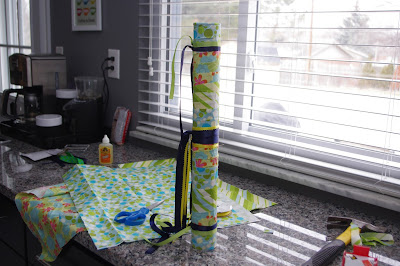
Then, I wrapped the whole thing in fabric, hot gluing as I went. I used three patterns cut into about 1 inch strips. The hot gluing was far more dangerous for Mama than the nails were. If I was inclined to commit a crime, Saturday would've been the day because I'm pretty sure I burned all my fingerprints off. Whoever allowed me to purchase a hot glue gun should be fired!
Sorry for that tangent but my fingers were hurtin'! I also hot glued the plastic end caps on with the fabric tucked underneath them. And, I added a little extra pretty by adding a few ribbons on each end an in the middle. Mr. S thinks it's a little girly. Maybe it is. Who cares?
Could a very curious, very determined kid tear this apart and gain access to 80 nails and around a cup of choking hazards (beans)? Yeah, probably, but he would need be unusually determined. E's not that curious, or that determined and certainly doesn't have that much patience.
Here it is all prettied up.


E likes it but he doesn't quite understand that he needs to flip it over to make it make the noise again. So he just holds it upright with the beans in the bottom and whines because it's not making noise. So, until he catches on, it really is a homemade toy fail. I mean, you definitely don't want to make toys that cause you and your kids extra frustration. Soon enough though, I know he'll get it and enjoy making all that noise! At least it'll be a peaceful rain-like noise... like meditating in the warm peaceful rain in Hawaii... like the soothing sounds of a baby's white noise machine... riiiiiight!
Monday, February 18, 2013
No Sew Tutu
When I saw this easy tutorial for a no sew tutu at Treasures for Tots on Pinterest, I knew I had to make one for my niece.
And when I saw tulle on sale at Hobby Lobby, I knew that was a sign. I went with dark purple, white and a shiny pinky purple. I was so excited to get started that I didn't take a single picture along the way. Doh!
I found some measurements online that a 4T was 21 inches. So, I made the tutu part 21 inches with 12-15 inches of extra length of ribbon on each end. The ribbon was the white ribbon left over from hanging my air plant. I strung 6 dark purple, 3 white, 1 pinky purple, repeat. The purple and white were very soft. The pinky purple was rougher and stiffer and scratchier so I didn't want to use a lot of it. It's hard to tell in the picture below, but it adds just enough sparkle to glam up the tutu just a little.
I delivered it to her at my sister's homecoming. The end result? She loved it! She also wouldn't stand still long enough for me to get a good picture of it. So, this is what you get.

And for the record, I stocked up on a bunch more tulle. I'm going to make more for my friends' girls because I enjoyed making it so much. Maybe I'll document it better next time. Also, next time I'm going to attempt to use elastic so it can last longer.
And when I saw tulle on sale at Hobby Lobby, I knew that was a sign. I went with dark purple, white and a shiny pinky purple. I was so excited to get started that I didn't take a single picture along the way. Doh!
I found some measurements online that a 4T was 21 inches. So, I made the tutu part 21 inches with 12-15 inches of extra length of ribbon on each end. The ribbon was the white ribbon left over from hanging my air plant. I strung 6 dark purple, 3 white, 1 pinky purple, repeat. The purple and white were very soft. The pinky purple was rougher and stiffer and scratchier so I didn't want to use a lot of it. It's hard to tell in the picture below, but it adds just enough sparkle to glam up the tutu just a little.
I delivered it to her at my sister's homecoming. The end result? She loved it! She also wouldn't stand still long enough for me to get a good picture of it. So, this is what you get.

And for the record, I stocked up on a bunch more tulle. I'm going to make more for my friends' girls because I enjoyed making it so much. Maybe I'll document it better next time. Also, next time I'm going to attempt to use elastic so it can last longer.
Friday, February 15, 2013

Subscribe to:
Posts (Atom)