Tuesday, January 29, 2013

BFF Mugs

My sister is coming home from Afghanistan this week. Can I just say YAY!? E and I will be going for a visit and we'll be celebrating all the holidays/events she missed while she was gone. I'm more than a little bit excited. So, while she's flying across the world, I'm getting crafty. First up, some BFF mugs for us to sip our coffee from while we chat on weekend mornings again. You know... when it's morning for both of us, not morning for me and evening for her.

These mugs are all over Pinterest and I think you can even buy them on Etsy if you're not up for making your own. I'm up for a challenge, so I went for it.

First, I started with some $1 mugs from IKEA. Except, they seemed too small and they were oddly sloped which was going to make the pictures skewed. So, I hit up Target and got some more substantial mugs for $3.50 each. Still, quite cheap.

I googled "Ohio silhouette" and "Virginia silhouette" and printed/cut those out. I used a little double sided tape to attach them to the mugs.

When I moved into my desk at work, I was left with a bunch of old school office supplies from the 70 year old man who lived in my cube before me. Things like transparencies and those transparency pens. Also, one of those black grease pencils. I don't even know what people used those for in the office environment. I've only ever seen them in the grocery store when I was a kid. Anyway, it has come in handy several times around the house. I used it to trace the outlines of the states.

Sip, sip... kitty wants a drink! 

The Pinterest ideas are for using Sharpie markers on the mugs and baking them to make them permanent. I splurged a few extra bucks for an actual paint marker that is made for ceramics. Once I had the grease pen outlines, I used my marker to trace inside and draw the hearts.


I let the marker dry for about 30 minutes before I carefully scrubbed off the grease pencil with a napkin. I wasn't sure how smeary the marker would stay and for how long. The directions said the marker needed to dry for 4 hours, but should be baked between 4 and 8 hours. They baked for 40 minutes at 425 degrees. Easy peasy.


I'm so excited for Sis to open them and then I'll return to Ohio with my Virginia mug.

Monday, January 28, 2013

"I love you because..." Sign


This is a super easy one and totally free. I had the frame just sitting around, waiting to be used. It was a "Welcome Home" sign from our real estate agent about 9 years ago when we bought our house. The Welcome Home stuff never went with our color scheme so I had never hung it. It's a great frame though! The paper was in my stash of scrapbook papers-- from a black/white wedding-ish 8x8 stack. I printed the words "i love you because" directly onto the paper and framed it up. A dry erase marker on the glass means it's easily changeable. I'm even willing to put a Valentine's stamp of approval on it. Done and done.


Wednesday, January 23, 2013

Work-Life Balance

Work-life balance is a hot topic. Something working moms (and sometimes dads) talk about often. Everyone wants it and everyone seems to struggle with it from time to time. It's not a harder or easier struggle than those of stay-at-home moms; it's just a different one.

I'm very fortunate that I have the type of job that allows me to usually lean toward the life side of that balance. Days off are easy to come by and nothing is more important than a sick kid. Of course I have to consider important meetings and tasks when I schedule my days off or cover my bases before I bolt out the door to pick E up from daycare with a fever, but compared to most jobs, I think I have it pretty good.

Sometimes, though, that balance swings to the other side. Things get crazy at work and everything hits at once. And when that happens, it's really hard on me. I don't deal well with it. I get easily frustrated and crabby. The next couple weeks are one of those times. I've gotten several opportunities that are good for career growth, but for some reason they all happened at the same time. This means long hours and travel.

I'm not looking forward to the stress but I'm also excited that I'll get to finish the two weeks up with a trip to my hometown to visit with my sister who's returning from Afghanistan. We've missed her so much and she hasn't seen E since he was 11 months old and not even walking yet.

So, how do I find work-life balance? Well, sometimes it's life and sometimes it's work. And when it's work, I just ride it through and take a few days off when it's all over to hug on my loveys. Luckily, for me, it all works out in the end.

Tuesday, January 22, 2013

A New Bed for Laika J. Dawg

We have two dog beds that are very specific sizes-- one fits in Laika's crate and one fits on her raised cot. She's a digger. Dig, turn, dig, turn, dig, turn. It makes me cray-cray. It also rips up dog bed covers. Since they're both just the right size, I decided that I'd make her a new cover, but keep the perfectly sized pieces of foam. I mean, they're that egg carton foam stuff... which I know is comfortable because I had it on my bed all through college.

I got my inspiration from this No Sew Fleece Blanket at A Chelsea Morning and this DIY No Sew Dog Bed at Luigi & Me. Do you see the common thread there? (Teehee, get it? Thread!) No sewing involved. I want to learn to sew... but I need to have a sewing machine first. So, for now, it's no sew options only. 

So, here's the downlow. I measured my foam and bought about one extra foot in each direction for the knots. This is where it gets super technical... I laid the fleece out on the living room floor, put the foam on top and eyeballed it. 


Then, I continued with the eyeballing and cut slits through both pieces of fleece all the way around and cutting the corners out so the ties worked out.


Then, I ever so mathematically put one piece on top of the foam and one piece under the foam and knotted, knotted, knotted. I contemplated not knotting the fourth side. I'm not sure if I'll ever be able to get the foam out. I want to believe that I can easily unknot one side and toss it in the wash. Or maybe I just wasted $20 (total) on fleece. Either way, it's way better than paying another $30 each for new beds. 


It's not even close to perfect but it looks cute and I think it's Laika J. Dawg approved.


Friday, January 18, 2013

Cheesy Potatoes for Two

I am a very lucky woman. Mr. S cooks dinner almost every night. He enjoys it. I don't. I grew up in a household where adding a little chopped ham to some Kraft mac and cheese was gourmet. So, I never learned how to cook and I've never really had the patience to learn. There are a handful of things that are my specialties and that's about it. I'm working on getting better at that.

 Mr. S also travels for his job occasionally. Before kid, that was my cue to have cereal for dinner for a few nights. He always felt bad that I was eating cereal for dinner, but honestly, I love cereal for dinner. Unfortunately, that seems like bad parenting so I try to make more substantial dinners when it's just me and E. He was gone last night so I tried a new side dish recipe.

It was inspired by these Creamy Cheesy Potatoes at Get Off Your Butt and Bake.

Spending a lot of time in the kitchen is not ideal when there's a toddler pretending that your legs are a bridge that he needs to go under... 100 times. These were very quick on the prep time, but took quite a while in the oven.

I wasn't interested in having a bunch of leftovers so I'll call mine Cheesy Potatoes for Two.

Ingredients
2 big russet potatoes
1 cup cream
1 cup-ish of cheddar cheese (or whatever is hanging out in the cheese drawer)
salt, pepper, garlic powder, other spices to taste

Directions
Cut the potatoes into fries. Mr. S just got some crazy nice knives (which also means crazy sharp) that he prefers me not to touch because I tend to be the type to cut my finger off with such a knife. So, I may or may not have taken advantage of this alone time to take one for a spin. I'll never tell. The best sized dish I could find was a 9-inch round ceramic baking dish.


Pour the cream over the cut potatoes. I added a very heavy pinch of kosher salt, a few grinds of pepper, a light sprinkle of garlic powder and a little parsley. Honestly, they could've used more flavor. I'd almost go with some sauteed onions. Then I topped the whole thing with cheese. I didn't measure; I just used what was left in the bag of "four state cheddar". I have no idea which four states, but it's pretty decent stuff.


Pop it in the oven for about an hour and fifteen. I took it out after an hour and the potatoes were still a little too crunchy. The additional fifteen minutes helped, but if I hadn't had a hungry toddler waiting for his grub, I would've given it an hour and a half total. Still, it came out bubbly and delicious looking. (Yes, there are some potatoes under all that cheese!)


Overall, these were just okay. Like I said above, they needed more flavor. Also, I'm not even much of a russet potato fan (is it crazy for me to say they're too potato-y?) so next time, I'd definitely go with some yellow potatoes-- which also won't take as long to cook.

So, 5 stars for ease and quickness of prep... maybe 3 stars for taste but, 4 stars for potential. I just need to work on the flavors and get the right potatoes. And, even though I wasn't blown away, E ate the hell out of these. So, 5 stars for kid-approval.

Are you a good cook? What new recipes are you trying in 2013?

Thursday, January 17, 2013

Red Sky at Night...

Straight from the sky to the camera, no post processing whatsoever. The sky was beautiful last night. 


Wednesday, January 16, 2013

Peanut Butter, Peanut Butter, More Peanut Butter and a Little Bit of Chocolate Cookies

I've seen all of these "pudding cookies" all over Pinterest. What the heck are they?, I thought. Why pudding?, I thought. I can't believe it took me so long to decide to make some. Now, I need to try all the varieties I can find. These were my first:

Peanut Butter Pudding Cookies from Sweet Pea's Kitchen

She adapted from another recipe, but I made her recipe exactly, with only one exception. I had teeny tiny Reese's Pieces so I used half a cup of them instead of a whole cup of the regular version. It could've used more. If I remake them (and I will!), I'll eliminate the chocolate chips completely and use 1.5 cup peanut butter chips and 1 cup mini Reese's Pieces. Still, these were frickin' fantastic.


So, here's my totally unscientific and unprofessional review: 

Prep difficulty: Pretty darn easy for a non-baker like me. It's a good reason to use the stand mixer.
Prep time: Average-- maybe 15-20 minutes.
Bake time: Quick-- done in 10-12 minutes. 
Quirks: These cookies pretty much did not spread. I'm the queen of turning a cookie sheet of cookies into one gigantic cookie because I never leave enough room. These are the perfect type of cookie for me. I'm pretty sure I made these pretty much exactly the size I was supposed to and there was probably three cookies worth of dough left after the 2 dozen. Don't worry... I took care of it. 
Taste: Very rich and very peanut buttery. This is a "requires a glass of milk" cookie. 
Dough taste: Delightful, but also very rich. Peanut butter cookie dough is probably my favorite and this didn't disappoint. 
Reviews: I don't like to keep stuff like this in the house because I could have easily eaten the 2 dozen cookies for dinner on Saturday. I took eight cookies to two different friends. This is what they said: 
Via Facebook post: "These cookies are UHH-May-ZING! If my husband doesn't stop eating them, I may have to injure him. ;)" 
Via text message: "These cookies are awesome!!!" Yes, with three exclamation points.  
This is definitely a winning recipe!

Tuesday, January 15, 2013

A Toddler Activity

Even though I work a 9-to-5, I like to pretend that I'm a craftastic stay-at-home mom. I imagine that SAHMs make lots of fun, crafty activities that keep their toddlers busy playing and learning all day long. Of course, I have no idea what SAHMs actually do. As far as I know, they could be sitting around all day eating Twinkies while the kids play with matches. But, I prefer to think they're craftastic.

So, this is my shot at a SAHM-ish toddler activity. 

I have a collection of clear plastic containers-- water bottles, juice bottles, snack containers. I filled them up with various things-- some noisy, some pretty. E has glittery water, water with beads, bottles with just beads and with bells, ribbons, sequins... you name it. They're dirt cheap and disposable when he bangs up the bottle/container too much. And, the possibilities are endless-- every time I take a trip down the craft aisle I get more ideas. 

For added safety, I'd suggest putting a little adhesive around the cap once the bottle is ready. You don't want your little ones getting those caps off and eating whatever treasures you've put on the inside. 


Beads in Water

Mini Gold Bells

Ribbons (for first birthday presents) and beads

Wednesday, January 9, 2013

A Successful Evening

E is tucked away in bed and Mr. S ran out to do some errands. I find myself searching through the living room for the remote. The TV hasn't been on all evening. I consider that a success.

I'm the first to admit that I'm addicted to TV. If Mr. S had his way, we wouldn't have cable at all. I just like it to be on in the background all the time and I catch bits and pieces of shows when I can. There are actually very few things that I regularly watch and give my full attention to. I used to have a DVR full of my "regulars", but that's changed significantly since having E.

Anyway, E is typically pretty grumpy in the evenings and I often let him "watch his songs" for about 30 minutes before dinner time. "Watch his songs" means watching a Baby Genius DVD of alleged favorite songs. And, although I know it's a bad habit, I typically have the TV on in the background most evenings.

I'm not a crazy no TV mom, but I do think it's a good sign if it's after 8pm and the TV is being turned on for the first time. It means we had a good evening of hanging out together. And, we did. Any evening that includes a walk around the neighborhood (it's an unseasonable 50 degrees today), some Electric Sliding, and plenty of "eating" fake fruits and veggies is a good evening in my book.

And on a completely random note, here's a perfect example of my gray life...


Look closely. You might think that I've black and whited except for E and the cat, but I didn't. It makes me laugh. I'm on a mission to add some color to my life. 

How do you add color without going crazy? Or do you like a little crazy? Do you have lots of color, or just a few accent colors with mostly neutrals? 

Tuesday, January 8, 2013

A Tuesday Quick Craft

I had the urge to do a little crafty crafty this evening but it needed to be quick. I have a glorious kid game that I want to rig up but it's a little complicated and I'd need to run out for supplies. Momma's been in her pajamas since we got home from work at 4:30 so that's a big ol' N.O. on running out for supplies.

Valentine's Day is around the corner so I thought I'd go that route. Mr. S and I don't typically celebrate V-Day because our anniversary is only two weeks later. Very nice planning on his part, dontcha think? I'm not really accustomed to doing much of anything, including crafts or decorating for V-Day.

I pulled out a few felt scraps and some embroidery floss and whipped up this little puppy. It's hanging on a frame that is part of a collage in our kitchen. It's a very, very subtle nod to V-Day. Plenty for me.


Any other quick crafters? Whatcha making?

Monday, January 7, 2013

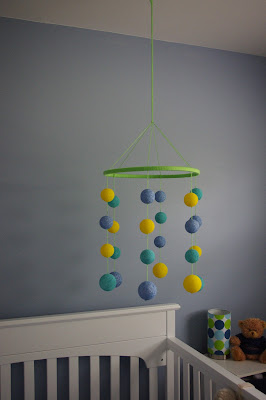
DIY Mobile


When I was decorating E's room, I kept seeing, and lusting after, those gorgeous (and expensive!) mobiles that are all over Etsy. I decided that I could make a reasonably cute one myself without spending a fortune. I thought it would be relatively temporary but little did I know that it would still be hanging more than a year later. He can reach it, but doesn't bother it at all.

So, here's what I did...

Supplies
Yarn
Embroidery hoop
Styrofoam balls
Acrylic paint
Big plastic needle (I'm not sure what they're actually used for, but you need something that will stab through the styrofoam balls)
Sponge paint brushes


It's a little time consuming, but it's easy:

1. Wrap the hoop with yarn. Wrap and wrap and wrap until there's no more hoop showing. 
2. Using the needle, string styrofoam balls, tying a knot under each ball to keep it in place on the string. If the needle is thin enough and the yarn is thick enough, the balls will pretty much hold themselves but I'd still add the knots for good measure. Leave a bunch of yarn at the top of each string of balls.  
3. Attach strings of balls to the hoop, tying all strings together to create the hanging part. This is a little complicated. I wrapped each string around the hoop and then brought all six of them together in a knot. Ultimately, there are six strings of yarn that go to the ceiling.
4. Paint the balls. The possibilities are endless! This took just one coat on each ball with a couple touch-ups at the end. The styrofoam paints surprisingly well. 
5. Hang and enjoy! 


Adjust the yarn so everything hangs evenly and use a Command hook to attach it to the ceiling. I have it hanging under a vent so it spins on its own when the heat or AC is blowing. Otherwise, a bit of a spin in one direction will make it unspin for a while. 

It was SO easy and the possibilities with different colors of paint and yarn are endless! 

Thursday, January 3, 2013

"Must Keep" Document Organization

It was a slow day at work today so I did a little organization.

I used to travel a lot. I thought I'd be ready to go again shortly after having E, but boy was I wrong. The thought of leaving my baby, for even one night, ripped my heart out of my chest. Luckily, budget cuts were hitting right around the time I was on maternity leave and when I went back to work, traveling was much harder to come by and required many approvals from management. That was quite a convenient excuse.

However, we have to keep our travel packages for 5 years so I still have a drawer full of paperwork. Each package includes a cover sheet, approval forms, itineraries, hotel, rental car, airline and miscellaneous receipts. My organization scheme for these packages goes a little like this: paperclip the package together, put it in the hanging folder marked "Travel". That folder has been a mess for so long. It's all there, but it's not pretty.


So, with a box of clear page protectors and a three ring binder from the supply cabinet, I got to work. Each package is really only 5-10 pages so each one fits just fine inside one page protector. When I was all done, I had a binder of clearly separated travel packages. Well, technically, I underestimated the size of binder I'd need and we didn't have one big enough so I have two binders until a huge (probably 4 inch) binder can be ordered. I think I'll use this method at home with things like users manuals and other important documents.


Sorry for no pretty pictures. Office work isn't pretty.

The bonus to this project was looking back at all the places I've been. I've been to Los Angeles and Washington DC the most. There were program reviews, conferences, flight tests, training, and educational outreach trips.

One trip brought me very close to where my sister was stationed. I went early and stayed with her for a couple nights and then she joined me in my fabulous hotel at the conference. She was pregnant with my niece at the time.

One trip brought me very close to where my brother lived. I stayed with him for a couple days when I was done with that recruiting event and got to meet my other niece for the first time.

I spent three weeks in the California desert in July and two weeks living in a dorm in Alabama. There were three long road trips-- one to Niagara Falls, which I took alone but stopped to visit my future brother-in-law at college; one to St. Louis, which was a group road trip in a rented van when I was 7 months pregnant; and one to Gettysburg, which was a "Leadership Trip" on a tour bus with senior management and junior engineers. Several of us went on a self-led ghost hunt through a graveyard in Gettysburg and the grounds keeper kicked us out.

In my non-working time on these trips, I've toured Naval aircraft carriers, visited the zoos, gone to major league baseball games, and generally seen the sights. I've been to LA, San Diego, Seattle, Dallas, Denver, Las Vegas, New York City, Atlantic City, Washington DC, Atlanta, Orlando and plenty more.

I've visited Canada, the UK and Germany. Mr. S went with me to the UK and we stayed a few additional days. The amount of walking we did in London might be the most I've ever done. He and E also joined me in Germany when E was just 10 months old. I worked almost the entire time but I was impressed with his ability to get around in a very foreign German village with a 10 month old. I'm certain if the roles were reversed, I would've sat in the hotel room all day.

Some trips were good, some were not-so-good, but all were memorable. It's probably something that I'll never do again-- at least not with as much frequency, but I'm so glad I got to do so much traveling early in my career.

And now, it's all neatly organized!

Wednesday, January 2, 2013

Map Fridge Magnets

My mom won't allow us to buy her Christmas presents. Yes, we've disobeyed her wishes in the past but for the last few years I've made her things. It started as a threat-- "If you won't let me buy you anything, I'll just make something!" She called my bluff and told me she'd love anything I made. So, she's gotten scrapbooks of my brother and sister's basic training graduation photos, a first year scrapbook for E's first year, a memo board and at least a couple other things that I can't think of right now.

This year was a special challenge. She and my step-dad are in the process of finding a new house so they're not putting anything on the walls and I didn't want to make anything that would clutter up the house at all. Also, since my sister is deployed in Afghanistan, I wanted something extra sentimental.

There's not a lot of time for crafting around here with a one year old running around, so I thought I might get her these keychains that I found on Etsy. They were perfect. I could get her one for each city where her kids/grandkids are located. That's 5 cities. That's an awful lot of keychain and I'm not even sure she uses much of a keychain since she has keyless entry on her car.

So, I drew some inspiration from those, strolled the aisles of the craft store and came up with my own idea-- heart-shaped map magnets! Each one represents a city where one of her loves (kids and grandkids) is located.

These were so easy!

Supplies:
heart-shaped wood; sheets of magnet that are sticky on one side [Michael's]
maps [Magazine section of Target; or the Internet for the Afghanistan one]
Mod Podge; pretty fine sandpaper


Since the wood is already in heart shapes, that's the template for everything else. Using a pencil, I traced a heart around the cities and on the magnets. (You could really use any kind of magnet, but I got sheets so I could cover the entire back with magnet.)

I Mod Podged the maps on one side of the wood, let it dry, sanded the edges a bit, and added one more coat of Mod Podge. Once it was all dry, I stuck the magnets on back and voila!

Total working time was around 30 minutes for 5 magnets. I did it over a couple days, though, so the Mod Podge would have time to dry. An hour of dry time is probably plenty.

I mailed them to my mom today so she hasn't seen them yet. I'm sure they'll be a hit. When I tested them on my fridge, I almost kept them for myself. I might have to make a couple more sets.


Did you make any Christmas gifts this year? Do you prefer to get store bought or handmade gifts?

Tuesday, January 1, 2013

It's Twenty-Thirteen

I think I just rang in the new year in the lamest way ever. I woke up at 11:52  (only by chance) and went to the living room to find that Mr. S had also fallen asleep.  We watched the ball drop and then went back to bed. This is what being parents has turned us into.

But that was last night. Now it's 2013. Time for a fresh start.

The Christmas tree and decorations are packed away in the storage unit-- wrapped up tight for about 11 months. All of the magic of the season is gone and it's back to business as usual tomorrow.

I have a fun project this year, though-- this blog. I'm excited to share my world with the interwebs. I'm excited to show people the things I make (for better or worse). I'm excited to push myself to accomplish the things on my To Do list. I'm excited to document some of the things I've done in the past. I'm excited to take photos of things besides my kid again.

My big goal for the year is to continue to pursue my quest for complete life organization. Man, is it a difficult quest. Some might even say impossible. And it's not just the organization; it's also getting everyone in the house on board because you gotta work at it continuously.

Anywho, I can't wait to use my two new planners. Yes, two. One will be used as a health diary. The bigger one is just for my daily planning purposes. I've always used Franklin planners in the past and combined work and home life into one place. It's huge and cumbersome though so I decided to go with something new. And honestly, it's no good for work. All of my work planning is done digitally.

Aren't they cute?


2013 is going to be a good year.

What are your goals for the year? What are some of your best organization tips? How do you get your family on board?