Guess what!
Our 10 year wedding anniversary is this weekend and we're the "I can't wait to give this to you!" type when it comes to presents so we exchanged a couple days ago. Mr. S got me a sewing machine!
One of my goals for the year is to a.) learn to sew and b.) sew E's receiving blankets into a quilt for his big boy bed (when the time comes... oh, I'm tearing up just thinking about him in a big boy bed.) That might be ambitious to accomplish in 10 months. I don't know. I've sewn before, but it's been a really long time and I never really did it enough to get good at it. It'll be an adventure, that's for sure.
The sewing machine is super fancy and I'm not familiar enough to even thread it so it's sitting in the box until I can redeem my free lessons/tutorial/orientation/whatever... which isn't until the 16th. Eek! I'm so excited to get started. I don't know how I'm going to last until the 16th.
So now, I have a new addiction-- pinning quilts on Pinterest. Wanna follow? Here's my quilt board.
In the meantime, maybe I should make it my goal to finish a scrapbook. For example, E's first year... which is 7 months past due. I don't know though... finishing one project before starting another? That just sounds like crazy talk!
What projects do you have waiting to get started? What long term projects are still waiting to be finished?
Is the sewing machine the traditional 10 year anniversary gift? Maybe the modern version? Haha... yeah, I doubt it.
Thursday, February 28, 2013
Tuesday, February 26, 2013
TP Roll Art
You know you've hit a crafting rock bottom when you start doing toilet paper crafts. Don't get me wrong, some of the TP stuff on Pinterest is really cool. Regardless of their cool factor, there will always be a certain ick factor about toilet paper roll crafts... to me, at least.
I've been struggling with what to put on my living room walls for... years? I had lots of things up, then we repainted and nothing went back on the walls. I keep thinking I want to make something, but can't decide what. I'm seriously in decision paralysis... for years!
When I saw these adorable picture frames by Creative Carmella on Pinterest, I got inspired. I don't want the picture aspect of it, but I love the funky circles. So, I ran with them and added a little ombre. It's the new hotness. Everyone loves ombre, right? Ombre and chevrons-- they're the king and queen of crafts right now.
Anyway, still pretty unsure how this would all turn out, I didn't want to spend much. I got a 16"x20" canvas for less than $4 at Hobby Lobby and used some acrylic paints that I already had around. I painted the canvas white. (It was already white, but I wanted to make sure it was as white as it could be.) Then I started with my circles.
After some TP roll diameter measuring (1.75", fyi) and some math, I decided to use three colors. I made three rows of just blue paint (I'm pretty sure the color was True Blue). Then, I added some white paint until I got a medium blue and made three rows of that. Then I added even more white paint to get a light blue and finished with three more rows.
Close up, I think it's cool. The ombre effect is very subtle, which was not what I was going for but it takes a heck of a lot of white paint to lighten that blue at all! And, of course, I didn't realize that until it was way too late.
I put it in the coveted between-the-front-door-and-picture-window position. I don't love it. It's not interesting enough from a distance. I love, love, love bright white on my dark gray walls but the white of the door and the super bright white of the window is just too much on either side of it.
Maybe I'll downgrade it to the hallway-between-the-bathroom-and-master-bedroom position. Or maybe I'll trash it because it cost less than $5 total. Maybe I'll donate it to Goodwill and someone will think they're getting a masterpiece...and they won't know it was painted with toilet paper rolls! Yep, you know it! Someone will be in there thrift shoppin' and they'll say "This is f'n awesome!"
Check out more Pinterest Challenge projects!
I've been struggling with what to put on my living room walls for... years? I had lots of things up, then we repainted and nothing went back on the walls. I keep thinking I want to make something, but can't decide what. I'm seriously in decision paralysis... for years!
When I saw these adorable picture frames by Creative Carmella on Pinterest, I got inspired. I don't want the picture aspect of it, but I love the funky circles. So, I ran with them and added a little ombre. It's the new hotness. Everyone loves ombre, right? Ombre and chevrons-- they're the king and queen of crafts right now.
Anyway, still pretty unsure how this would all turn out, I didn't want to spend much. I got a 16"x20" canvas for less than $4 at Hobby Lobby and used some acrylic paints that I already had around. I painted the canvas white. (It was already white, but I wanted to make sure it was as white as it could be.) Then I started with my circles.
 |
| My Tools (ew) |
Close up, I think it's cool. The ombre effect is very subtle, which was not what I was going for but it takes a heck of a lot of white paint to lighten that blue at all! And, of course, I didn't realize that until it was way too late.
 |
| Do you see the ombre? Sad, sad ombre. |
 |
| Kinda hypnotizing, yes? (Ignore the Command hook peeping out the top-- my temporary hanging solution until I make up my mind.) |
Maybe I'll downgrade it to the hallway-between-the-bathroom-and-master-bedroom position. Or maybe I'll trash it because it cost less than $5 total. Maybe I'll donate it to Goodwill and someone will think they're getting a masterpiece...and they won't know it was painted with toilet paper rolls! Yep, you know it! Someone will be in there thrift shoppin' and they'll say "This is f'n awesome!"
Check out more Pinterest Challenge projects!
Monday, February 25, 2013
Felt Board
I've been working on a project. A very much ongoing project that may just go on forever. I made E a felt board. I bought the biggest (cheap) canvas I could fine at Hobby Lobby, which happened to be 30"x40" and was $16 after my 40% coupon. I cut and hand sewed a grassy hill (green felt) onto a blue sky (blue felt) and then stretched and stapled the whole thing to the canvas. Tada! Felt board. That part was easy, albeit a bit time consuming. That part is also done.
It's all the "game pieces", if you will, that might keep me cutting and sewing felt for the rest of my days. I've been finding inspiration everywhere to make little scenes for E to play with. As soon as I made the first couple pieces, I let him have access to the board. I admit, I typically wait until I'm completely finished with a project before letting destroy...er... play with it. So, it was hard to hand over.
For the past couple weeks, he'd wake up in the morning or from a nap and discover what new pieces are on the board. I'm sure I'll revisit this post many times, but here's what I have so far.
The full scene (minus the third piece of road, which has already disappeared):


Dinosaurs strolling down the road. Makes perfect sense, right? Houses, airplanes, dinosaurs. It happened.


And here's a close-up of that pond. It's really my favorite part. Well, it might be a tie between the pond and the rain cloud.

On my near future to-do list:
It's all the "game pieces", if you will, that might keep me cutting and sewing felt for the rest of my days. I've been finding inspiration everywhere to make little scenes for E to play with. As soon as I made the first couple pieces, I let him have access to the board. I admit, I typically wait until I'm completely finished with a project before letting destroy...er... play with it. So, it was hard to hand over.
For the past couple weeks, he'd wake up in the morning or from a nap and discover what new pieces are on the board. I'm sure I'll revisit this post many times, but here's what I have so far.
The full scene (minus the third piece of road, which has already disappeared):

The slightly flower-ish looking sun. But you know it's a sun because it's wearing sunglasses. right?

The peacefully weepy cloud and the airplane.

Dinosaurs strolling down the road. Makes perfect sense, right? Houses, airplanes, dinosaurs. It happened.

The house (I need to make at least one more), with an apple and lemon tree, and a pond with ducks and a frog next to a coniferous forest of three.


If you've never experienced one of these boards, it all works by friction. Nothing is stuck all that well but it stays in place well enough for imagination time. In fact, because nothing sticks that well, a good slap to the canvas knocks most of it off. I decided it would be HI-larious to bang on the canvas and yell "EARTHQUAKE!" after E had set everything up. He did not think it was funny. In fact, he cried. Maybe he's not the little destroyer I think he is.
On my near future to-do list:
- One more house
- More animals/dinos
- People
- A rocketship
- A bus
- Couple cars/trucks
- Another piece of road
- A rainbow
- Lightning?
- More clouds
Thursday, February 21, 2013
Cold Night, Hot Chocolate
We're expecting ice tonight. The frigid temps have me wanting some yummy hot chocolate.
Oh, who am I kidding? Breathing makes me want some yummy hot chocolate.
I could make this Polar Express Hot Chocolate but I'm missing about half of the ingredients. And, there's no way I'm going out in the cold to get them. And, it's probably not advisable (diet-wise, at least) to be drinking sweetened condensed milk on a Thursday night. And, this recipe makes 10+cups and I don't feel like doing the math to shrink it... and I definitely don't need to be drinking 10 cups of hot chocolate tonight.
So, here it is... some Swiss Miss and marshmallows from a bag. It's not glamorous, but it'll do the trick. And maybe one day, I'll have a reason to make 10 cups of hot chocolate.

Wednesday, February 20, 2013
Rain Stick
Our office is moving to a different building in the next couple months. Last Friday was slow so I was doing a little tidying up to get ready for the move. Stashed way under my desk, I found a long mailing tube that someone had sent to me.


I immediately flashed back to this list of the 5 Best Toys of All Time. Could it be true? Did I just find the #4 best toy of all time under my desk? I mean, E has played with toilet paper tubes, paper towel tubes and even a wrapping paper tube, but this was taking it to a whole new level. How lucky is E?!
But then, I started thinking even more creatively. What about a rain stick? Surprisingly, it wasn't something I had pinned on Pinterest. It was something I had just seen in passing while surfing the interwebs. I actually had to re-search for it and find a site with a good how-to. This one from Mama Scout seemed the most like what I was looking for.
Here's how mine went...
My supplies included the coveted mailing tube, a crap ton of nails (I think I used a total of 80), something to make the noise-- I used beans and also (not pictured) rice, something to pretty it up (mine is fabric wrapped).

First, I hammered. And hammered and hammered. The cardboard mailing tube is perfect for the nail approach (verses some of the other approaches I've seen using tooth picks or skewers) because it's easy to hammer into, but quite sturdy. I made circles around the tube with nails, trying to stagger them as much as possible. I think I used 80 nails, and I could've used another box if I had it.


This certainly does not look like a toddler toy, right? No worries, I took some safety precautions. I wrapped the whole tube in packing tape to keep the nails in place-- and add an extra layer of protection between the nails and E's curious fingers.

Next came the filler. I started with just beans but I needed a softer sound so I added some rice. It's really a trial and error kind of thing. You just need to test it out until you find the sound you like. I admit, I wish I had used more nails because I feel like my fillings fall a little too fast. I was just too dang excited to complete it to run out for another box of nails. It's sort of rain stick-y but it's really more like an oddly shaped maraca. Whatever. It makes noise and that's the #1 feature to an 18 month old.
Then, I wrapped the whole thing in fabric, hot gluing as I went. I used three patterns cut into about 1 inch strips. The hot gluing was far more dangerous for Mama than the nails were. If I was inclined to commit a crime, Saturday would've been the day because I'm pretty sure I burned all my fingerprints off. Whoever allowed me to purchase a hot glue gun should be fired!
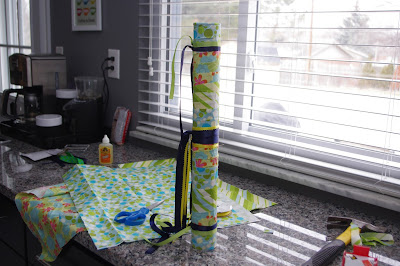
Sorry for that tangent but my fingers were hurtin'! I also hot glued the plastic end caps on with the fabric tucked underneath them. And, I added a little extra pretty by adding a few ribbons on each end an in the middle. Mr. S thinks it's a little girly. Maybe it is. Who cares?
Could a very curious, very determined kid tear this apart and gain access to 80 nails and around a cup of choking hazards (beans)? Yeah, probably, but he would need be unusually determined. E's not that curious, or that determined and certainly doesn't have that much patience.
Here it is all prettied up.


E likes it but he doesn't quite understand that he needs to flip it over to make it make the noise again. So he just holds it upright with the beans in the bottom and whines because it's not making noise. So, until he catches on, it really is a homemade toy fail. I mean, you definitely don't want to make toys that cause you and your kids extra frustration. Soon enough though, I know he'll get it and enjoy making all that noise! At least it'll be a peaceful rain-like noise... like meditating in the warm peaceful rain in Hawaii... like the soothing sounds of a baby's white noise machine... riiiiiight!
Monday, February 18, 2013
No Sew Tutu
When I saw this easy tutorial for a no sew tutu at Treasures for Tots on Pinterest, I knew I had to make one for my niece.
And when I saw tulle on sale at Hobby Lobby, I knew that was a sign. I went with dark purple, white and a shiny pinky purple. I was so excited to get started that I didn't take a single picture along the way. Doh!
I found some measurements online that a 4T was 21 inches. So, I made the tutu part 21 inches with 12-15 inches of extra length of ribbon on each end. The ribbon was the white ribbon left over from hanging my air plant. I strung 6 dark purple, 3 white, 1 pinky purple, repeat. The purple and white were very soft. The pinky purple was rougher and stiffer and scratchier so I didn't want to use a lot of it. It's hard to tell in the picture below, but it adds just enough sparkle to glam up the tutu just a little.
I delivered it to her at my sister's homecoming. The end result? She loved it! She also wouldn't stand still long enough for me to get a good picture of it. So, this is what you get.

And for the record, I stocked up on a bunch more tulle. I'm going to make more for my friends' girls because I enjoyed making it so much. Maybe I'll document it better next time. Also, next time I'm going to attempt to use elastic so it can last longer.
Friday, February 15, 2013

Thursday, February 14, 2013
A Valentine's Day Yarn Wreath
I love making them. I've made Christmas yarn wreaths and every day yarn wreaths. I'll post some of those later. But for today, how about a hot pink wreath with conversation hearts?


My bow tying skills leave a little to be desired. These are easy to make, but quite time consuming-- especially the yarn wrapping. The conversation hearts are left over wood hearts from the map magnets I made for my mom. I just painted them with some pastel acrylic craft paint and then when they dried, I used a red Sharpie to write the words on them. Honestly, I only taped them on here because I think I'm going to re-purpose this as an Easter wreath of some sort. Normally, they'd be hot glued on.


My bow tying skills leave a little to be desired. These are easy to make, but quite time consuming-- especially the yarn wrapping. The conversation hearts are left over wood hearts from the map magnets I made for my mom. I just painted them with some pastel acrylic craft paint and then when they dried, I used a red Sharpie to write the words on them. Honestly, I only taped them on here because I think I'm going to re-purpose this as an Easter wreath of some sort. Normally, they'd be hot glued on.
Wednesday, February 13, 2013
Fabric Room Divider
Have you priced out those three panel room dividers? They're not cheap. So, I decided to make one. We had a bunch of stuff that we kept in a corner between the couches. Stuff including the drums and guitars for our Guitar Hero/Rock Band games. Yeah, we're nerds. I wanted to have that stuff accessible, but hidden. Hence, the room divider.
I enlisted Mr. S to cut the wood for me. We just used some super cheap 2in trim wood. (Is that the right term for it?) He made me two 2ft wide and 6ft tall rectangles. Our intention was to make it three panels, but once he brought me the second one, I realized that two were big enough. I think we made them a little extra big. I've certainly never seen them this big in the store. I suppose that's the advantage of making your own-- not only is it cheap, you can make them whatever size you need. Not to mention, you have endless fabric choices too.
So anyway, he just cut the wood and nailed them together. Nothing fancy because they were about to get covered with fabric. I used the super high tech method of laying the fabric on the floor, putting the frames on top and eyeballing the cut. Then I got even more high tech and stapled it to the back of the frames.
Here's the fabric. Wish I knew the name. It's a simple teal and white/cream flower pattern.


After I got both panels covered, I had Mr. S attach them with some small hinges. I did this on top of the fabric because otherwise I would've had to figure out how to stretch the fabric around the hinges and that was not going to happen. Note: nothing here needs to be heavy duty. I mean, it's just going to stand around. And that wood is really light. Here's a look at the hinge. We just used two-- one about 1.5ft from the top, and one 1.5ft from the bottom.


I enlisted Mr. S to cut the wood for me. We just used some super cheap 2in trim wood. (Is that the right term for it?) He made me two 2ft wide and 6ft tall rectangles. Our intention was to make it three panels, but once he brought me the second one, I realized that two were big enough. I think we made them a little extra big. I've certainly never seen them this big in the store. I suppose that's the advantage of making your own-- not only is it cheap, you can make them whatever size you need. Not to mention, you have endless fabric choices too.
So anyway, he just cut the wood and nailed them together. Nothing fancy because they were about to get covered with fabric. I used the super high tech method of laying the fabric on the floor, putting the frames on top and eyeballing the cut. Then I got even more high tech and stapled it to the back of the frames.
Here's the fabric. Wish I knew the name. It's a simple teal and white/cream flower pattern.

And here's a close up of my stapling skillz. See those folded corners? Ah, yeah! No, just kidding. I suck, but it looks good from the front and that's all that matters.

After I got both panels covered, I had Mr. S attach them with some small hinges. I did this on top of the fabric because otherwise I would've had to figure out how to stretch the fabric around the hinges and that was not going to happen. Note: nothing here needs to be heavy duty. I mean, it's just going to stand around. And that wood is really light. Here's a look at the hinge. We just used two-- one about 1.5ft from the top, and one 1.5ft from the bottom.

And here's the full effect-- along with the cat and the dog. There's a bunch o' junk behind that divider, but you'd never know. Of course, it kind of draws attention so people always ask what's up with it, which means our junk may be hidden, but it's definitely not a secret.

Tuesday, February 12, 2013
Malty Whopper Cookies
I'm a nut for malt. I love going to the ice cream shop and getting a chocolate malt... double malt. Or a vanilla malt... double malt. Or a strawberry malt... double malt. Yeah, I love it. And, when the chick behind the counter cannot concern herself with fully mixing in all that malt and there's a big gob in the bottom of the cup-- heaven. I feel like malts are something that little old ladies love. Is it? Whatev.
As you might expect, I could eat Whoppers day and night. For that reason, I typically keep them out of the house. When I saw this recipe for Malt Whopper Pudding Cookies by Chef in Training, I had to try it.
Something about making this recipe seemed weird. For example, I thought you always did butter and sugars, then eggs and vanilla, then all combined dry ingredients. Maybe the order doesn't matter. I don't pretend to know a single thing about making cookies, but I have made a few recipes and this just seemed different. Anyway, the only thing I did different was I chopped up the Whoppers instead of leaving them whole.
They were pretty easy to make, though. You basically just throw everything into the stand mixer, then ball out the dough.
The dough was really sticky. Like, really, really sticky. It was also really, really delicious. I know, I know-- raw eggs. Whatever. It was awesome.
My biggest critique is that these cookies spread like a mofo. I wonder if I had added a little more flour, if that would've helped with the stickiness and maybe kept them from spreading some.
The interesting thing about these cookies is that they were this weird (awesome) combination of crunchy and chewy. And they taste amazing. I was really put off by the spreading (it's my least favorite characteristic in a cookie) but Mr. S LOVED these cookies. As in, he was begging me to make more.
I think I'll give them another go sometime-- maybe with a little more flour.
 |
| The least spread of the bunch... |
Monday, February 11, 2013
Coffee Station
After we renovated our kitchen and had about three times as much counter space, we had to make decisions about what to keep on the counter tops and what to put away. Prior to the renovation, the only things that got that precious counter space were the coffee pot, the microwave and the knife block. Even frequent use appliances, like the toaster, had to be stored in the dining room closet.


Anyway, not only did the coffee pot get to say out after the reno, but I made an entire coffee station with the grinder, filters, and a couple canisters for coffee and sugar.
I got these canisters at Target on clearance for a couple bucks each. They're a little suction-y to make them pretty air tight. The tall one holds exactly one of the one-pound bags of coffee. Super bonus: the white lids are smooth plastic and my handy dandy wax pencil writes on them perfectly. The tray was also from Target for about $10. It's a good place to keep the coffee scoop and a sugar spoon. The tray is particularly handy because we're not so great at not spilling coffee grounds and sugar so the tray catches it all and it's super easy to rinse clean. And, you can't see them in any of these pictures (that's the point) but there's a ziplock bag full of coffee filters (the cone type) hidden behind the coffee pot so we only have to step away from the station to get water. The sink is only three steps away.


I fancied it up with an mid-century print from Benton Park Prints and funk-a-rific blue clock from All15Designs. These are two of my favorite things in my house.


Put it all together for the full effect, and this is what you get. Our coffee station that makes me smile every morning, snuggled right between the back door and a very large window that looks out onto the backyard.

Friday, February 8, 2013
Felt Letters
I've been lusting after some adorable felt stuff on Etsy lately. Specifically, I was loving the letters. E is starting to learn some letters and the bright colors are great too. They are really expensive though. I mean, really. So, I convinced myself that I can totally make my own. And, I can. And, I did.
I admit, this took me about three weeks to do. I'd do a letter or two each night when I had time. It's a craft that needs to be saved until after children are in bed because rambunctious 18 month olds and mommies with needles in hand is not a good combo.
But, it was super easy.
I spent a little time on Word searching for a good blocky font. I chose super basic Arial Black, used all caps and bolded it. My font size was 330 pt. This meant I could get 2-3 letters per page. I printed them in a light gray so I could just see them to cut out and to not use up all the black ink in my printer. I did all the printing and paper cutting at once.


I finished one letter at a time. First, I cut two of each letter. And then I used matching embroidery floss to sew up the edges. This could be fancied up with contrasting colors, light/dark colors, or whatever pleases ya! I stuffed some poly fill in each letter as I went. I tried to use a little strategery with the sewing. For example, I'd start at the top or bottom of the E, then sew around the legs so I was left with just the back open. That enabled me to wait until I got to the very last side to do the stuffing. Shapes like the S and the Q weren't quite as easy to strategize.


I admit, this took me about three weeks to do. I'd do a letter or two each night when I had time. It's a craft that needs to be saved until after children are in bed because rambunctious 18 month olds and mommies with needles in hand is not a good combo.
But, it was super easy.
I spent a little time on Word searching for a good blocky font. I chose super basic Arial Black, used all caps and bolded it. My font size was 330 pt. This meant I could get 2-3 letters per page. I printed them in a light gray so I could just see them to cut out and to not use up all the black ink in my printer. I did all the printing and paper cutting at once.


I had 9 colors of felt that I wanted to use. I don't think you could have 26 different colored letters, but I could be wrong. To cut out each letter, I taped the paper letter to the felt. I even used more tape than necessary because cutting through the tape ensured that I was cutting good lines.


Three weeks later, I finished up my 26 letters. Are they perfect? Heck no! But they still look pretty darn good. And E won't know any difference.


Then, in a fit of craft craziness. I decided that he needed a bag for his letters. So, this happened.

And it holds his letters perfectly. The square on the bottom is 5in x 5in and it's about 7.5in tall.

Best of all, this used eleven 8.5x11 sheets of felt. At $0.25 each, that's a whopping $2.75 in felt and maybe a couple dollars worth of embroidery floss and poly fill, but I actually already had that stuff. Compare that to at least $30 for a set of letters on Etsy. Blam!
Wednesday, February 6, 2013
Pepperoni Rolls
Mr. S and I grew up in West Virginia. The pepperoni roll is a local favorite. The story goes that back in the day, the coal miners used to take a stick of pepperoni and a loaf of bread for lunch. They wanted a one fist meal so one miner decided to bake the pepperoni into the bread and the pepperoni roll was born.
Since leaving WV, we've run into some people who think they know what pepperoni rolls are. They don't. They're always thinking of something more fancy... like a calzone or a stromboli. Pepperoni rolls are simple food for simple people. Hard working coal miners. In our hometown, you buy pepperoni rolls in the bread aisle of the store... in a 6- or 12-pack like hot dog buns or hamburger buns.
And once you leave the state, you make them yourself.
They're super simple.
Ingredients:
Frozen bread dough
Pepperoni slices
I put the dough in the non-preheated oven at 175 for about an hour. I usually spray it with non-stick cooking spray and put a piece of plastic wrap over it (or them...I usually make 3 loafs worth at a time.) I also use a silpat mat. (I use silpat mats for everything.) I usually make 8 pepperoni rolls from one loaf of bread dough. Sometimes I make tiny ones and make 16 per loaf.
Once the dough is thawed and slightly risen, cut it up into 8 pieces.

One by one, mush (that's the technical term) and stretch each piece into the most rectangular shape you can get. Lay 5-6 slides of pepperoni along the rectangle. Feel free to use less or more depending on your tastes. Roll it up and lay it on the mat with the seam down. Do as I say, not as I do. I have no idea how these three ended up with the seam on the side.

Bake them at 350 degrees for 20-25 minutes until golden brown.

These are amazing straight out of the oven. Or dipped in some marinara. Or sliced open with a piece of cheese melted inside. Or cold for an easy take-along lunch. Or as road trip food. Or as airplane food. Or as picnic food. Or as a midnight snack. You get the idea.
Bonus funny pepperoni roll story: When I was in college in South Carolina, I'd always bring back a few packages of pepperoni rolls for me and my roommate. This was before I had mastered (or even tried) making them myself so when they were gone, they were gone. We were having the last two pepperoni rolls one night for dinner. She had put her pepperoni roll on the coffee table while she was getting something else. Lars (my then and now cat) loves pepperoni rolls. He got on the coffee table and took her pepperoni roll in his mouth and ran away with it. She chased him down, took it back and ate it anyway. Yeah, they're that good. And they're still one of Lars' favorites.
Tuesday, February 5, 2013
Air Plant Artwork
I was looking for something a little different for a collage in our kitchen. I got this white open frame at Hobby Lobby and decided it would be perfect. I Christmas-ed it up by hanging a shiny silver ornament just like this during the holiday season. When it was time to remove the ornament, I knew I wanted something similar. I found this air plant and hanging terrarium on Etsy. A little white ribbon to tie it all up and I was set.


And now that I look at this shot, I know exactly what is going to take the place of the bacon print. A big S... maybe Mod Podged with some pretty scrapbook paper. Stay tuned to see how it turns out.

The air plant is awesome because all you need to do is give it a little spray with water a few times a week. It needs bright light, but not direct sunlight. There's a window just to the left of this frame, but the sun never shines directly in. I think this might be a plant that I can keep alive.

Here's a little wider view. The stand mixer, toaster and various other things live on the counter below this collage. There are also two blue pendant lights over the bar area that juts out from the wall under this collage. I adore that bacon print, but I think the colors are a little out of place there. I'm going to figure a way frame it up with magnets on the back so it can be pretty fridge art. Or maybe I'll just use some washi tape and tape it to the fridge.

And now that I look at this shot, I know exactly what is going to take the place of the bacon print. A big S... maybe Mod Podged with some pretty scrapbook paper. Stay tuned to see how it turns out.
Monday, February 4, 2013
Candy Dish
You know what's awesome? Being without cable and internet for several days. No, just kidding. It's not awesome. Anyway, I think we have that mess settled so I should be posting more normally.
I've been holding onto this one because it's one of my faves. This was something I saw on the interwebs, but I can't really remember where. It's so cheap and so cute.
Whatcha need: A terracotta pot (top and bottom), a fishbowl, a wooden knob, spray paint, glue. I suggest getting all your supplies at the same time (you can get them all at Michael's, for sure) to make sure your pot and fishbowl are compatible sizes. They have lots of sizes so you could make a teeny tiny candy dish, or a ginormous candy dish.
This is yet another The Possibilities Are Endless craft.
Whatcha do: First, glue the knob to the bottom of the saucer part of the pot. Let that dry per glue instructions. Spray paint both parts of the pot. I went with white. Again, the possibilities are endless. Once the pot color is to your liking and its' all dry, glue the fishbowl to the bottom of the pot.
This can be changed up in so many ways. Big or small, endless color and pattern possibilities. Even the type of candy can completely change the personality of it. I made this one for a friend at work. I didn't think it was a good idea to have a candy dish around the house-- especially such a breakable one. BUT, I think I'm going to need to make myself one. I'm thinking a super bright and glossy blue.


Did I mention that the possibilities are endless? And best of all, this is a less than $10 craft!
Subscribe to:
Posts (Atom)